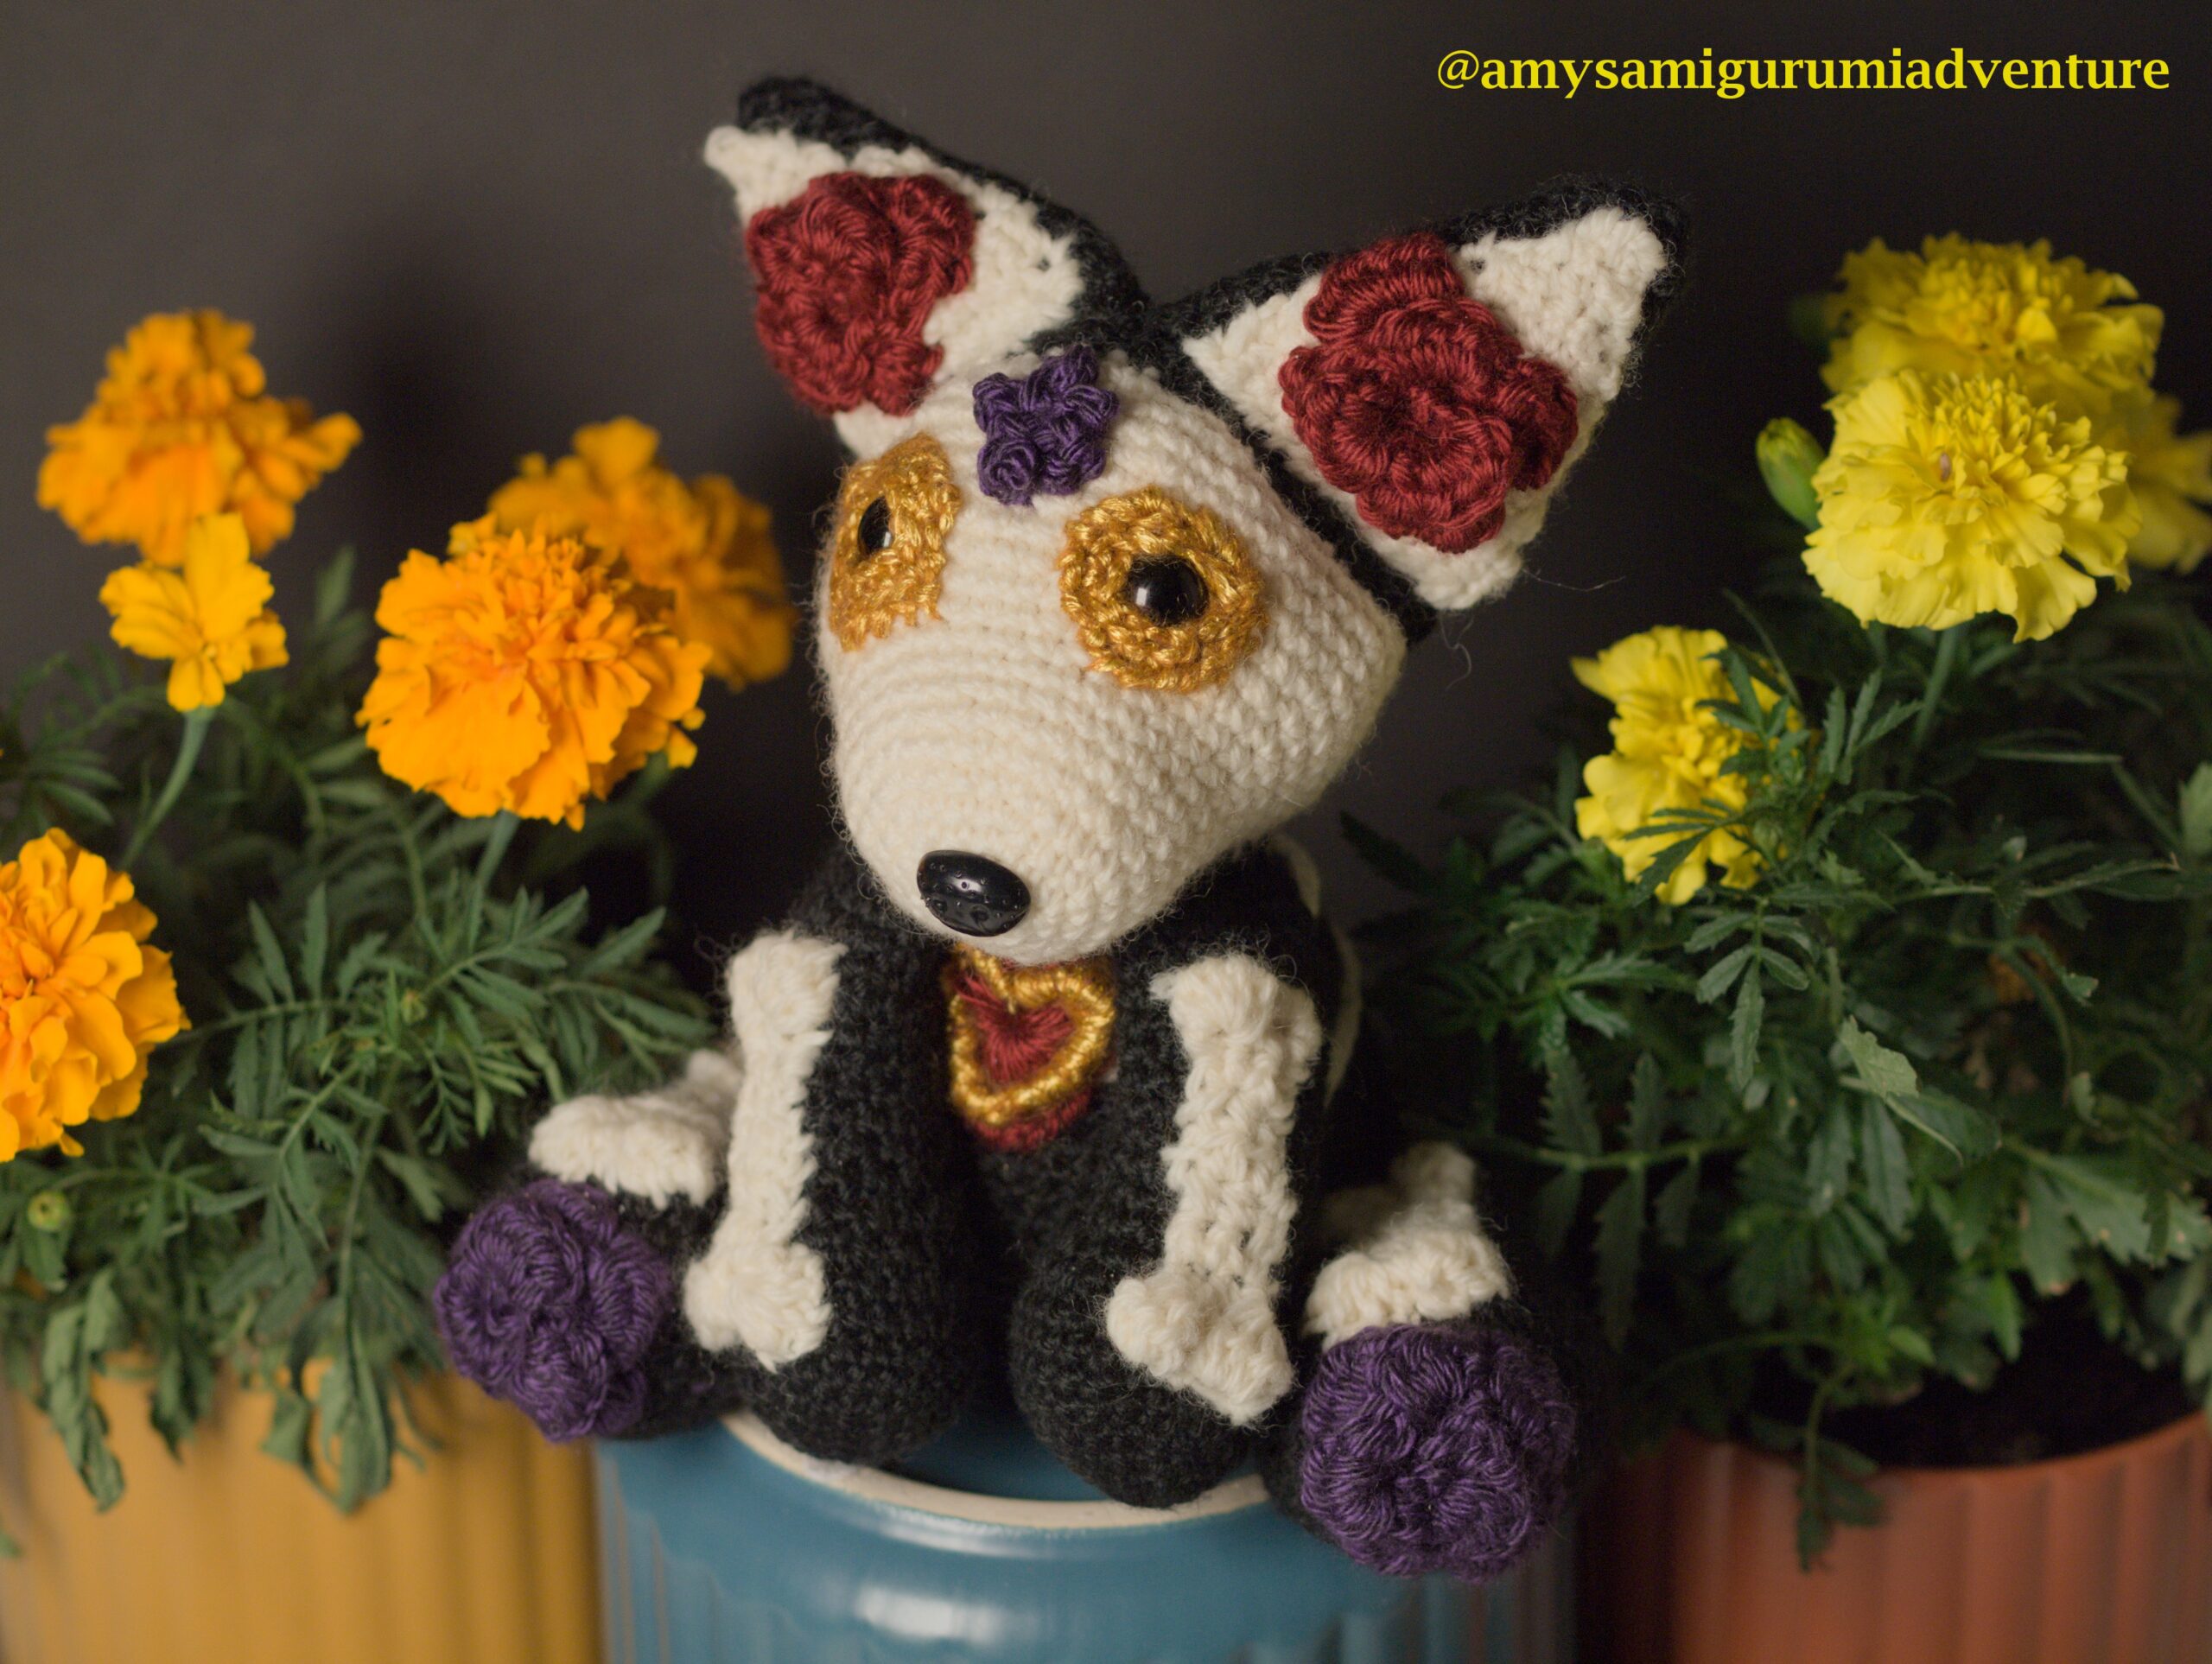
This was my very first original pattern: a Day of the Dead dog crochet pattern. I tried to find one, but I couldn’t, so I decided to make my own. I really liked the idea of a dog that had gone over the rainbow bridge coming back to visit, especially since I currently own two dogs and one is 13 years old.
The Day of the Dead (el Día de los Muertos), is a Mexican holiday where families welcome back the souls of their deceased relatives for a brief reunion that includes food, drink and celebration. A blend of Mesoamerican ritual, European religion and Spanish culture, the holiday is celebrated each year from October 31-November 2. While October 31 is Halloween, November 2 is All Souls Day or the Day of the Dead. According to tradition, the gates of heaven are opened at midnight on October 31 and the spirits of children can rejoin their families for 24 hours. The spirits of adults can do the same on November 2.
Day of the Dead (Día de los Muertos) – Origins, Celebrations, Parade | HISTORY
Please do not redistribute my pattern or share screenshots of it. Feel free to sell finished creations to your heart’s content.
Difficulty
The base body (the head, ear, body, legs, and tail) of the Day of the Dead Dog are for a beginner. I include a lot of annotation to make it beginner-friendly.
The decorations are optional, and are more for advanced beginner – early intermediate. Below, the pattern provides options, and give you links to ideas for how you want to decorate it.

Yarn:
This is all made with worsted (size 4 U.S.) yarn. You can use whatever yarn you want, but these were the ones I used:
White yarn: Inspirations Patons Classic Wool Worsted
Black yarn: Carons Simply Soft Solids Yarn 100% Acrylic Black
Red yarn: Caron Burgundy, Simply Soft Solids Yarn
Gold yarn: Ice Yarns Glam Universe Copper Gold Shades
Purple yarn: Lion Brand Heartland Yarn Hot Springs
One skein of the black yarn as enough, and I had plenty of the white yarn leftover
Safety Eyes & Safety Nose:
You can use black yarn to embroider, or create an eye patch. I used these:
FEMBW 600PCS Safety Eyes and Noses with Washers for Stuffed Animal Amigurumi Doll Crochet, 6-14mm Black Glitter Plastic Eyes for Crafts Teddy Bear Making
Amazon.com: Craftdady 100Sets Black Plastic Safety Noses Crafts with Washers for DIY Doll Toys Puppet Plush Animal Making
Hook:
Size 4mm (U.S.) hook
Glossary of Stitches
st = stitch
ch = chain
SC = single crochet
INC = 2 SC in one stitch
DEC = You can do an invisible decrease or a 2sc2tog.
HDC = half double crochet (optional)
MR = Magic Ring
Beginner Tip: When instructed to do a magic ring, you have two choices. You can either do the magic ring, or you can do the alternative chain 2 method. Links for both below:
How to Crochet a Magic Loop | The Woobles
Start a round piece with a chain – The Woobles
MAIN BODY
The number in brackets at the end is the number of stitches in the round or row.
Body
Yarn Color: Black
- 6 SC MR [6]
Beginner Tip: This means do a magic ring with six single crochet stitches. - INC X 6 [12]
- (SC in next st, INC) X 6 [18]
Beginner Tip: This is doing (a) a single crochet in the next st and then (b) an increase in the next st, and then repeating a & b six times all the way around. - (SC 2, INC) X 6 [24]
Beginner Tip: This is doing (a) a single crochet in the next st, (b) a single crochet in the next st, and then (c) an increase in the next step, and then repeating a, b, and c six times all the way around. - (SC 3, INC) X 6 [30]
- (SC 4, INC) X 6 [36]
- (SC 5, INC) X 6 [42]
- (SC 6, INC) X 6 [48]
- SC 48 [48]
- SC 48 [48]
- SC 48 [48]
- SC 48 [48]
- SC 48 [48]
- SC 48 [48]
- SC 48 [48]
- SC 48 [48]
- SC 48 [48]
- SC 48 [48]
- (SC 6, DEC) X 6 [42]
- SC 42 [42]
- (SC 5, DEC) X 6 [36]
- SC 36 [36]
- (SC 4, DEC) X 6 [30]
- SC 30 [30]
- (SC 3, DEC) X 6 [24]
- SC 24 [24]
Front Legs
Make two of these.
Yarn Color: Black
Optional: If you would like the ends of the legs to be a different color other than black, choose that color and start with it, and do a color change at the beginning of Row 7. I just did it all in black.
- 6 SC MR [6]
- INC X 6 [12]
- (SC in next st, INC) X 6 [18]
Beginner Tip: Do (a) a single crochet in the next st and then (b) an increase in the next st, and then repeating a & b six times all the way around. - (SC 2, INC) X 6 [24]
Beginner Tip: Do (a) a single crochet in the next st, (b) a single crochet in the next st, and then (c) an increase in the next step, and then repeating a, b, and c six times all the way around. - SC 24 [24]
- SC 24 [24]
- SC 24 [24]
- SC 24 [24]
- SC 12, DEC X 6 [18]
Beginner Tip: Do (a) twelve single crochet stitches in the next twelve stitches, and then (b) do a decrease stitch over the next twelve stitches. - SC 18 [18]
- SC 14, DEC X 2 [16]
Beginner Tip: Do (a) fourteen single crochet stitches in the next twelve stitches, and then (b) do a decrease stitch over the next four stitches. - SC 16 [16]
- SC 16 [16]
- SC 16 [16]
- SC 16 [16]
- SC 16 [16]
- SC 16 [16]
- SC 16 [16]
- SC 16 [16]
- SC 16 [16]
- SC 16 [16]
- SC 16 [16]
- (SC 6, DEC) X 2 [14]
Beginner Tip: Do (a) six single crochet stitches over the next six stitches, and then (b) a decrease stitch. Repeat (a&b).
When you stuff the legs, stuff heavier towards the paws, and more lightly in the upper legs.
Hind Legs
Make two of these.
Yarn Color: Black
Optional: I used a rose decoration that I sewed on for the hind legs, but if instead you would like the ends of the legs to be a different color other than black, choose that color and start with it, and do a color change at the beginning of Row 7.
- 6 SC MR
- INC X 6 [12]
- (SC in next st, INC) X 6 [18]
Beginner Tip: Do (a) a single crochet in the next stitch and then (b) an increase in the next stitch, and then repeating a & b six times all the way around. - (SC 2, INC) X 6 [24]
Beginner Tip: Do (a) a single crochet in the next stitch, (b) a single crochet in the next stitch, and then (c) an increase in the next step, and then repeating a, b, and c six times all the way around. - (SC 3, INC) X 6 [30]
- (SC 4, INC) X 6 [36]
- SC 36 [36]
- SC 36 [36]
- (4 SC, DEC) X 6 [30]
- SC 30 [30]
- (SC 2, DEC) X 6, 6 SC [24]
Beginner tip: Do (a) two single crochet stitches over the next two stitches, and then (b) a decrease stitch. Repeat (a) & b six times. Then do six single crochet stitches. - SC 24 [24]
- (SC, DEC) X 6, 6 SC [18]
- SC 18 [18]
- SC 18 [18]
- SC 18 [18]
- SC 18 [18]
- SC 18 [18]
- SC 18 [18]
- SC 18 [18]
- SC 18 [18]
- SC 18 [18]
- SC 18 [18]
- (SC 4, DEC) X 3 [15]
- SC 15 [15]
When you stuff the legs, stuff heavier towards the paws, and more lightly in the upper parts of the legs.
Tail
Yarn Color: Black
1. 6 SC MR [6]
2. (SC, INC) X 3 [9]
3. SC 9 [9]
4. (SC, INC) X 4, SC [13]
Beginner tip: Do (a) a single crochet stitch, then (b) an increase stitch. Repeat a & b 4 times. Then finish with a single crochet stitch.
5. SC 13 [13]
6. SC 13 [13]
7. SC 13 [13]
8. SC 13 [13]
9. SC 13 [13]
10. SC 13 [13]
11. SC 13 [13]
12. SC 13 [13]
13. SC 13 [13]
Head
Yarn Colors: Black & White
Start with white yarn.
- 6 SC MR [6]
- INC X 6 [12]
- (SC in next st, INC) X 6 [18]
Beginner Tip: This is doing (a) a single crochet in the next st and then (b) an increase in the next st, and then repeating a & b six times all the way around. - (SC 2, INC) X 6 [24]
Beginner Tip: This is doing (a) a single crochet in the next st, (b) a single crochet in the next st, and then (c) an increase in the next step, and then repeating a, b, and c six times all the way around. - (SC 3, INC) X 6 [30]
- SC 30 [30]
- SC 30 [30]
- SC 30 [30]
- SC 30 [30]
- SC 30 [30]
- (SC 4, INC) X 6 [36]
- (SC 5, INC) X 6 [42]
- (SC 6, INC) X 6 [48]
- (SC 7, INC) X 6 [54]
- SC 54 [54]
- SC 54 [54]
- (SC 8, INC) X 6 [60]
- SC 60 [60]
- (SC 8, DEC) X 6 [54]
- (SC 7, DEC) X 6 [48]
Color change to black yarn.
Beginner Tip: This is a helpful video on how to do color changes: Crafty Intentions How to do color changes – YouTube - (SC 6, DEC) x 6 [42]
- (SC 5, DEC) X 6 [36]
- SC 36 [36]
- (SC 4, DEC) X 6 [30]
If you’re going to use safety eyes and safety nose, put them in here and stuff before closing. - (SC 3, DEC) X 6 [24]
- (SC 2, DEC) X 6 [18]
- (SC 1, DEC) X 6 [12]
- DEC X 6 [6]
Fasten off and sew closed.
Ears
Make 2 of these.
Outer Ear
Yarn Color: Black
1. 6 SC MR [6]
2. (SC, INC) X 3 [9]
3. SC 9 [9]
4. (SC 2, INC) X 3 [12]
5. SC 12 [12]
6. (SC 3, INC) X 3 [15]
7. SC 15 [15]
8. (SC 4, INC) X 3 [18]
9. SC 18 [18]
10. (SC 5, INC) X 3[21]
11. SC 21 [21]
12. (SC 6, INC) X 3 [24]
13. (SC 7, INC) X 3 [27]
14. (SC 8, INC) X 3 [30]
15. SC 30 [30]
16. (SC 8, DEC) X 3 [27]
17. SC 27 [27]
Flatten the ears and stuff very lightly.
Inner Ear (Optional)
I prefer the look of making the inner ear white, but you may prefer to leave the ear black. This one section is also a bit more advanced than the rest of the pattern. Feel free to skip this step.
Yarn Color: White
1. Chain 12
2. Starting from the second chain from hook, single crochet 11. [11]
3. Ch 1, turn, SC 11. [11]
4. Ch 1, turn, DEC, SC 9 [10]
5. Ch 1, turn, SC 10 [10]
6. Ch 1, turn, SC 8, DEC [9]
7. Ch 1, turn, SC 9 [9]
8. Ch 1, turn, DEC, SC 7 [8]
9. Ch 1, turn, SC 6, DEC [7]
10. Ch 1, turn, SC 5, DEC [6]
11. Ch 1, turn, DEC, SC 2, DEC [4]
12. Ch 1, turn, SC, DEC, SC [3]
13. Ch 1, turn, SC, DEC [2]
14. Ch 1, turn, DEC [1]
Fasten off with a long yarn tail. Sew to attach to the outer ear.
SPINE & DECORATION
Depending on how you stuff your piece, you may want to adjust how long or short some of these instructions are to fit correctly. Also, feel free to divert from here and make your own decorations! This is the part that will make your creation truly yours. The following make the pattern more “advanced beginner”. ALL of the following are OPTIONAL — feel free to mix and match as you please.

Back Spine (Advanced Beginner)
Yarn Color: White
For this, we are going to do single crochet in an oval. Here is a link with tips on how to do an oval: How to Crochet An Oval, The Easy Way for Beginners | TREASURIE
1. Chain 13
2. SC into the third chain from the hook
3. SC down the chain
4. Do three single crochets into the chain at the end
5. SC down the other side of the chain
6. Do three single crochets in the chain at the end
7. Slip stitch into the starting stitch from Step 2.
Chest Ribs (Advanced Beginner)
Use chains for these. The exact length will vary based on how tightly you made your body, and how you stuffed it. Experiment with the length that looks good to you. Keep your yarn tails long at each end so you can sew them in.
For mine, I did a Chain of 12, 16, and 20 for the ribs.
Front Leg Bone (Advanced Beginner)
1. Ch 4
2. Working into the second chain from hook, Bobble, SC, Bobble
Here are instructions on how to do a bobble stitch: How to Crochet a Bobble Stitch – Easy Crochet Patterns
3. Ch 1, turn, SC 3
4. Ch 1, turn, SC 3
5. Ch 1, turn, HDC 3
Here are instructions on how to do HDC: How to Half Double Crochet Stitch (HDC) – Sarah Maker
You could also just do single crochet if you prefer that look.
6. Ch 1, turn, HDC 3
7. CH 1, turn HDC 3
8. Ch 1, turn, Bobble, SC, Bobble
Back Leg Bone (Advanced Beginner)
1. Ch 4
2. Working into second chain from hook, Bobble, SC, Bobble
Here are instructions on how to do a bobble stitch: How to Crochet a Bobble Stitch – Easy Crochet Patterns
2. Ch 1, turn, SC, skip the next st, SC
3. Ch 1, turn, SC 2
4. Ch 1, turn, SC 2
5. Ch 1, turn, HDC 2
Here are instructions on how to do HDC: How to Half Double Crochet Stitch (HDC) – Sarah Maker
You could also just do single crochet if you prefer that look.
6. Ch 1, turn, HDC 2
7. Ch 1, turn, HDC 2
8. Ch 1, turn, INC, SC
9. Ch 1, turn, Bobble, SC, Bobble

Eyelid (Beginner)
You may want to change this based on the size of the eye. You could create an eyepatch. I used 12mm safety eyes. Make sure to start with a long enough yarn tail to weave in later.
1. Ch 8
2. Starting in the second chain from hook, SC 7
3. Ch 8
4. Starting in the second chain from hook, SC 7
Wrap it around the eye and slip stitch.
Heart (Intermediate)
Yarn: Red (and Gold, optionally)
For this, I made the heart following this pattern by Sarah Makker, except I used a size 4mm hook and worsted weight yarn. I stopped after round one to keep it small. You need to be comfortable with the magic ring for this.
Free Crochet Heart Pattern – 3 Sizes – Sarah Maker
I then went through and outlined the heart with the gold yarn going around the inner loops.
Because I didn’t create this part like I did the rest, I will only link you to the pattern instead of copying it.


Roses (Intermediate)
Yarn: Red and Purple
For this, I made the smallest rose pattern here (starting with a chain 21). I made two in red for the ears and two in purple for the legs.
Free Easy Rose Crochet Pattern | Skip To My Lou
Stars (Intermediate):
Yarn: Purple (optional)
For the one on the forehead, I used: Teeny Tiny Crochet Stars – Repeat Crafter Me
You need to be comfortable with the magic ring.
ASSEMBLY
I recommend pinning the legs and tail to the body, and then working on the back spine and ribs before sewing the legs on. I personally used larger pins for the heavier body parts and smaller pins for the spine and ribs.
I use Clover Bamboo Marking Pins to attach the heavier parts.
I really learned how to sew to attach when I made a dragon by Crafty Intentions, and followed this Youtube Video to learn: Crafty Intentions How to: Sew to attach Part 2 – YouTube


